what is fragment in android
Spoke Right
/ 20 Nov, 2023
Being a part of an activity, the Fragment in Android is also known as a sub-activity, i.e an activity can have more than one fragment. Multiple screens are represented by the fragments in an activity. Since the fragments are included in the activity, the Android fragment lifecycle gets affected by the activity lifecycle. Also since the fragments are embedded in an activity, a fragment has its own life cycle methods that are affected by the activity life cycle. To make the interaction between the fragment objects, the FragmentManager class is used.
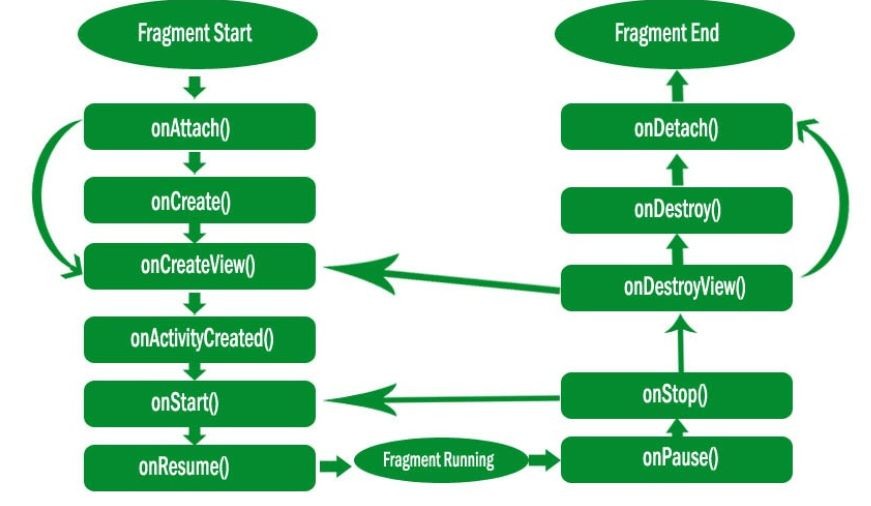
Android Fragment Lifecycle Methods:
Similar to the activity lifecycle, the android fragment also has a lifecycle. For a fragment, there are 12 lifecycle methods in Android. These are:
- onAttach(Activity): This method is invoked only once when fragment is attached with activity.
- onCreate(Bundle): This method is used to initialize the specified fragment.
- onCreateView(LayoutInflater, ViewGroup, Bundle): This method is used to create and return view hierarchy.
- onActivityCreated(Bundle): This method is called after onCreate() method completion.
- onViewStateRestored(Bundle): This method is used to inform the specified fragment that fragment view hierarchy saved state has been restored successfully.
- onStart(): This method is used to make the fragment visible.
- onResume(): This method is used to make the fragment interactive.
- onPause(): This method is invoked at the time fragment is no longer interactive.
- onStop(): This method is called at the time fragment is no longer visible.
- onDestroyView(): This method is used to clean up the resources used by fragment.
- onDestroy(): This method is used to do final clean up of fragment state.
- onDetach(): This method is invoked just before to the fragment no longer being associated with its activity.
Android Fragment Example:
In the below example, we are demonstrating the usage of the Android fragment.
File: activity _main.xml:
In the activity_main.xml file, we will add the TabLayout and ViewPager view components.
File: build.gradle:
In the build.gradle file, we will add the dependency library of the TabLayout.
apply plugin: 'com.android.application'
android {
compileSdkVersion 28
defaultConfig {
applicationId "com.example.radioapp"
minSdkVersion 23
targetSdkVersion 28
versionCode 1
versionName "1.0"
testInstrumentationRunner "android.support.test.runner.AndroidJUnitRunner"
}
buildTypes {
release {
minifyEnabled false
proguardFiles getDefaultProguardFile('proguard-android-optimize.txt'), 'proguard-rules.pro'
}
}
}
dependencies {
implementation fileTree(dir: 'libs', include: ['*.jar'])
implementation 'com.android.support:appcompat-v7:28.0.0'
implementation 'com.android.support.constraint:constraint-layout:1.1.3'
implementation 'com.android.support:design:28.0.0'
implementation 'com.android.support:support-v4:28.0.0'
testImplementation 'junit:junit:4.12'
androidTestImplementation 'com.android.support.test:runner:1.0.2'
androidTestImplementation 'com.android.support.test.espresso:espresso-core:3.0.2'
} File: MainActivity.java: To make the slides of the different fragments of tabs we are implementing an additional listener addOnPageChangeListener(listener) of ViewPager and to select the current tab on tab selection we are implementing another additional listener addOnTabSelectedListener(listener) of TabLayout, in the MainActivity.java file. package com.example.radioapp;
import android.support.v7.app.AppCompatActivity;
import android.os.Bundle;
import android.support.design.widget.TabLayout;
import android.support.v4.view.ViewPager;
import app.com.sample.R;
public class MainActivity extends AppCompatActivity {
TabLayout tabLayout;
ViewPager viewPager;
@Override
protected void onCreate(Bundle savedInstanceState) {
super.onCreate(savedInstanceState);
setContentView(R.layout.activity_main);
tabLayout = findViewById(R.id.tabLayout);
viewPager = findViewById(R.id.viewPager);
tabLayout.addTab(tabLayout.newTab().setText("Home"));
tabLayout.addTab(tabLayout.newTab().setText("About"));
tabLayout.addTab(tabLayout.newTab().setText("Blog"));
tabLayout.setTabGravity(TabLayout.GRAVITY_FILL);
final MyAdapter adapter = new MyAdapter(this,getSupportFragmentManager(),
tabLayout.getTabCount());
viewPager.setAdapter(adapter);
viewPager.addOnPageChangeListener(new TabLayout.TabLayoutOnPageChangeListener(tabLayout));
tabLayout.addOnTabSelectedListener(new TabLayout.OnTabSelectedListener() {
@Override
public void onTabSelected(TabLayout.Tab tab) {
viewPager.setCurrentItem(tab.getPosition());
}
@Override
public void onTabUnselected(TabLayout.Tab tab) {
}
@Override
public void onTabReselected(TabLayout.Tab tab) {
}
});
}
} |
File: MyAdapter.java: package com.example.radioapp;
import android.content.Context;
import android.support.v4.app.Fragment;
import android.support.v4.app.FragmentPagerAdapter;
import android.support.v4.app.FragmentManager;
class MyAdapter extends FragmentPagerAdapter {
Context context;
int totalTabs;
public MyAdapter(Context c, FragmentManager fm, int totalTabs) {
super(fm);
context = c;
this.totalTabs = totalTabs;
}
@Override
public Fragment getItem(int position) {
switch (position) {
case 0:
Home homeFragment = new Home();
return homeFragment;
case 1:
About aboutFragment = new About();
return aboutFragment;
case 2:
Blog blogFragment = new Blog();
return blogFragment;
default:
return null;
}
}
@Override
public int getCount() {
return totalTabs;
}
} For all different tabs, we will create different fragment files. File: Home.java: package com.example.radioapp;
import android.os.Bundle;
import android.support.v4.app.Fragment;
import android.view.LayoutInflater;
import android.view.View;
import android.view.ViewGroup;
import app.com.sample.R;
public class Home extends Fragment {
public Home() {
// Required empty public constructor
}
@Override
public View onCreateView(LayoutInflater inflater, ViewGroup container,
Bundle savedInstanceState) {
return inflater.inflate(R.layout.fragment_home, container, false);
}
} |
File: fragment_home.xml: File: About.java: package com.example.radioapp;
import android.os.Bundle;
import android.support.v4.app.Fragment;
import android.view.LayoutInflater;
import android.view.View;
import android.view.ViewGroup;
import app.com.sample.R;
public class About extends Fragment {
public About() {
// Required empty public constructor
}
@Override
public View onCreateView(LayoutInflater inflater, ViewGroup container,
Bundle savedInstanceState) {
return inflater.inflate(R.layout.fragment_about, container, false);
}
} |
File: fragment_about.xml: File: Blog.java: package com.example.radioapp;
import android.os.Bundle;
import android.support.v4.app.Fragment;
import android.view.LayoutInflater;
import android.view.View;
import android.view.ViewGroup;
import app.com.sample.R;
public class Blog extends Fragment {
public Blog() {
// Required empty public constructor
}
@Override
public View onCreateView(LayoutInflater inflater, ViewGroup container,
Bundle savedInstanceState) {
return inflater.inflate(R.layout.fragment_blog, container, false);
}
} File: fragment_blog.xml: File: AndroidManifest.xml: |
|
|
0 comments